Imagine having a dedicated AI partner available 24/7 to answer customer questions, capture leads, and help drive sales directly from your website.
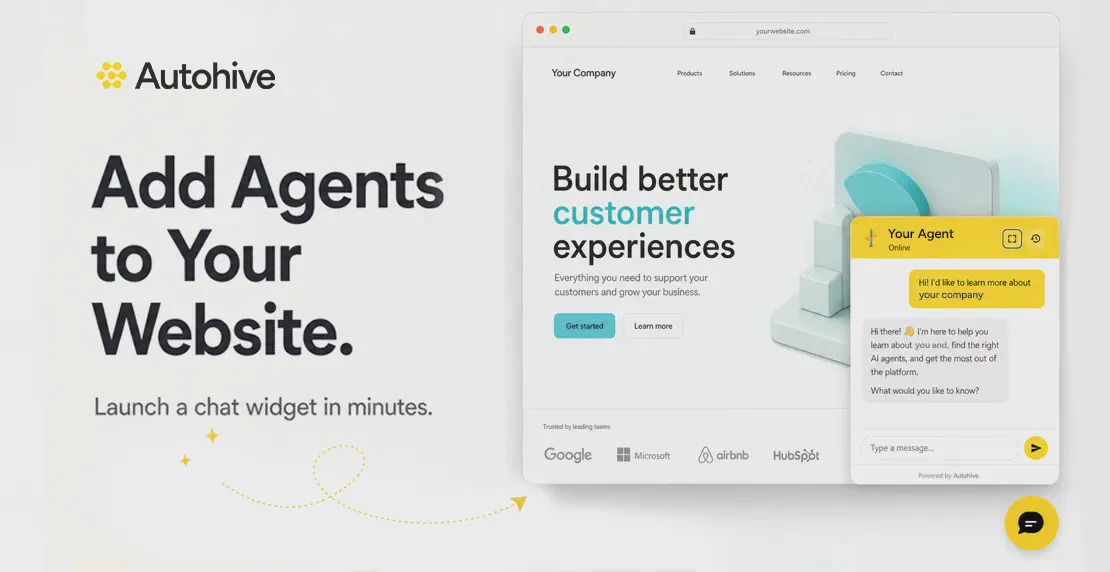
With Autohive widgets, you can take any of your custom AI agents and embed them directly onto your site as an interactive chat bubble. Visitors can start chatting instantly, without needing to log in, create an account, or leave the page they are on.
Whether you want to scale customer support, create a smoother lead generation funnel, or give website visitors faster access to helpful information, Autohive widgets make the process simple.
In this guide, we’ll walk through how to create, customize, preview, and install your first Autohive widget.
An Autohive widget is a website chat experience powered by one of your Autohive agents.
Instead of keeping your AI agent inside your Autohive workspace, a widget lets you place that agent directly on your public website. This means your customers, prospects, or website visitors can interact with your agent in real time.
For example, you could use an Autohive widget to:
Answer common support questions
Capture new leads
Qualify sales inquiries
Help users navigate your website
Troubleshoot issues with customers
Collect files or screenshots for support requests
Provide instant responses outside business hours
The key benefit is accessibility. Your visitors do not need an Autohive account. They simply open the chat bubble and start a conversation.
Why add an AI chat widget to your website?
Website visitors often arrive with questions. If they cannot find answers quickly, they may leave before taking the next step.
An AI-powered widget helps reduce that friction.
Instead of forcing visitors to search through documentation, submit a contact form, or wait for a team member to reply, your Autohive agent can respond immediately. That creates a better experience for the visitor and saves time for your team.
Autohive widgets are especially useful for businesses that want to:
Improve response times
Reduce repetitive support work
Convert more website visitors into leads
Offer support outside normal working hours
Provide consistent answers across customer conversations
Give users a more interactive website experience
Because the widget is powered by an agent you have already created, it can reflect your business knowledge, tone, processes, and customer experience.
Getting started: create your first widget
Before creating a widget, you will need an existing Autohive agent ready to use.
For example, you might already have a dedicated Support Assistant agent that answers common customer questions. Or you may have a Sales Assistant designed to qualify leads and recommend next steps.
Once your agent is ready, head to your Autohive dashboard.
From the left-hand menu, click More, then select Widgets. From there, choose the option to create your first widget.
Autohive will ask you to complete a few key setup details.
Name your widget
First, give your widget a clear and descriptive name.
This name is for internal use only. Website visitors will not see it. The purpose is to help you and your team identify the widget later inside your workspace.
For example, you might name your widget:
Website Support Widget
Sales Inquiry Chat
Product Help Assistant
Customer Onboarding Widget
A clear name is especially useful if you plan to create multiple widgets for different websites, brands, teams, or use cases.
Select the agent that will power the widget
Next, choose the Autohive agent that will power the chat experience.
This is the agent your website visitors will interact with. The agent’s instructions, knowledge, tone, and available actions will determine how the widget responds.
For example, if you select a support-focused agent, the widget can help customers troubleshoot issues. If you select a sales-focused agent, it can help qualify prospects and guide them toward a booking or inquiry.
Choosing the right agent is important because the widget is simply the delivery channel. The agent is what creates the actual conversation experience.
Add your website domain
You will also need to enter the domain name of the website where the widget will appear.
This helps connect the widget to the correct site and ensures it is configured for the right environment.
Once these core details are complete, you can move on to customizing how the widget looks and behaves.
Customize the widget experience
A good chat widget should feel like a natural part of your website, not something bolted on as an afterthought.
Autohive gives you control over both the appearance and behavior of your widget, so you can align it with your brand and your customer experience.
Appearance settings
The appearance settings let you adjust how the widget looks to visitors.
These options help ensure the chat bubble fits neatly into your website design and supports your brand identity.
Set a custom welcome message
Your welcome message is the first thing visitors see when they open the chat.
A strong welcome message should be clear, friendly, and action-oriented. It should help visitors understand what the agent can do and encourage them to ask a question.
For example:
Hi there! I can help answer questions about our products, pricing, or support options. How can I help today?
Or:
Need help? Ask me a question and I’ll point you in the right direction.
This small detail can have a big impact on engagement. A clear welcome message gives users confidence that the chat is useful and worth interacting with.
Match the chat icon to your brand
Autohive also lets you change the chat icon color.
This allows you to match the widget to your website’s visual identity. You can use a brand color, a high-contrast accent color, or a shade that stands out without clashing with your design.
The goal is to make the widget noticeable, but not distracting.
Choose the widget position
You can also adjust where the widget appears on the screen.
This is important because websites often have other fixed elements, such as cookie banners, help buttons, checkout buttons, or mobile navigation bars.
By choosing the right position, you can make sure the widget is easy to find without blocking important website content.
Behavior settings
Beyond visual customization, Autohive lets you control how visitors can interact with your widget.
These behavior settings are especially useful for support, security, and lead capture workflows.
Enable screen grabs
Screen grabs allow users to capture and share a screenshot of the web page they are currently viewing.
This can be incredibly helpful for troubleshooting.
Instead of asking a customer to explain what they are seeing, your support agent can receive a visual reference. That makes it easier to understand layout issues, error messages, broken pages, or confusing user flows.
For support teams, this can reduce back-and-forth and speed up resolution times.
Allow file attachments
You can also enable file uploads through the widget.
This is useful when visitors need to share documents, screenshots, forms, images, or other supporting files as part of the conversation.
Autohive lets you specify which file types are permitted, giving you control over what users can upload.
This is helpful for keeping the experience focused and reducing unwanted or unsupported file submissions.
Set rate limits
Rate limiting helps protect your agent from spam or overuse.
You can control how many messages a single user is allowed to send within a specific timeframe. This gives you a practical safeguard while still allowing genuine visitors to get the help they need.
Rate limits are especially important for public-facing widgets because anyone visiting your website can access the chat.
Install the widget on your website
Once your widget settings are configured, click Create.
Autohive will generate a simple install script for your website.
Installing the widget is as easy as copying a single line of code and pasting it into your website’s header or footer. Once added, the chat bubble will appear on your site and visitors will be able to start interacting with your agent.
If you use a website platform or content management system, you can typically add the script through your site settings, theme settings, tag manager, or custom code area.
If your website is managed by a developer, simply send them the script and ask them to add it to the appropriate location.
Personalize the chat for logged-in users
For a more personalized experience, the widget script can also pass visitor information into the conversation.
For example, if someone is logged into your website, you may be able to pass details such as their name and email address to the widget.
This allows your Autohive agent to greet users by name and provide a more tailored experience.
Instead of a generic message, the agent can create a warmer interaction, such as:
Hi Sarah, how can I help you today?
This kind of personalization can make the chat feel more human and relevant, especially for customer portals, SaaS platforms, membership sites, or ecommerce accounts.
Preview your widget before going live
Before publishing your widget to your live website, you can use Autohive’s built-in preview feature.
The preview opens a test environment inside the platform, giving you an accurate look at how the widget will appear and behave on a real site.
This is a useful step because it lets you test the full visitor experience before making it public.
When previewing your widget, try asking a few common questions, such as:
What services do you offer?
How do I contact support?
Can I upload a screenshot?
What are your pricing options?
How do I get started?
Check that the agent responds clearly, follows your expected tone, and provides useful next steps.
If anything feels off, you can adjust the agent or widget settings before installing it on your website.
Manage your widget without editing website code
One of the most useful parts of Autohive widgets is that you can manage them directly from your Autohive dashboard.
If you ever need to take the widget offline, you do not need to ask a developer to remove code from your website.
Simply return to the Widgets menu in Autohive and disable the widget.
The chat bubble will instantly disappear from your site. When you are ready to bring it back, re-enable it with a single click and it will reappear.
This gives your team more control and reduces the need for technical support when making simple changes.
Best practices for using Autohive widgets
To get the most value from your widget, it helps to think carefully about the experience you want to create.
Here are a few best practices to keep in mind.
Start with a clear use case
Before launching your widget, decide what job it should do.
Is it mainly for support? Lead generation? Product guidance? Customer onboarding?
A focused widget usually performs better than one trying to do everything at once.
Choose the right agent
Your widget is only as effective as the agent behind it.
Make sure the selected Autohive agent has the right instructions, knowledge, and tone for the audience it will serve.
Test common visitor questions
Before going live, test the questions your visitors are most likely to ask.
This helps you spot gaps and improve the agent before customers interact with it.
Keep the welcome message simple
Avoid long or vague greetings.
A good welcome message should quickly explain how the agent can help and invite the visitor to take action.
Monitor and improve over time
Once your widget is live, review how people use it.
Look for repeated questions, unclear responses, or missed opportunities. Then update your agent so the experience keeps improving.
Key takeaways
Autohive widgets let you embed your custom AI agents directly on your website.
Visitors can interact with your agent instantly without needing to log in or create an account.
You can customize the widget’s welcome message, color, and screen position.
Behavior settings let you enable screen grabs, file attachments, and rate limits.
Installation only requires a simple script added to your website’s header or footer.
You can preview the widget before publishing it.
Widgets can be disabled or re-enabled from the Autohive dashboard without changing website code.
Conclusion
Autohive widgets make it easy to bring your AI agents directly into your website experience.
Whether you want to support customers faster, capture more leads, or give visitors a better way to interact with your business, a widget turns your website into a more helpful and responsive channel.
With simple setup, flexible customization, and easy installation, you can launch your first widget quickly and start giving visitors instant access to your Autohive agent.
Ready to transform your website’s visitor experience? Head to your Autohive dashboard, create your first widget, and let your agents get to work.
Jono is the Marketing Operations Lead at Autohive, bridging the gap between commercial strategy and AI-powered execution. With a passion for building systems that scale, he brings structure to complexity and turns marketing activity into measurable …


Joe Sutheran